Extending Privacy

Sam Macbeth’s blog

This one took a surprising amount of time to figure out. We want a function that takes a string input that contains base64 encoded data, calculates the SHA-256 hash of that data, then returns that hash as a base64 encoded string.

Our existing implement relied on node's Buffer, which gets polyfilled by browserify. Buffer provides easy helper functions for jumping to and from base64 encoding:

const buffer = Buffer.from(base64String, 'base64')
const convertedString = buffer.toString('base64')
// convertedString === base64String

If we want to do this same conversion in the browser, without polyfilling Buffer, the code is a bit less pretty. These Stack Overflow answers point out how to convert to Arraybuffer and back.

Putting this together, the final code, which works both in the browser, and in node:

async function checksum(data) {
    // Convert base64 string into a Uint8Array
    const binaryString = atob(data)
    const buffer = new Uint8Array(binaryString.length)
    for (let i = 0; i < binaryString.length; i++) {
        buffer[i] = binaryString.charCodeAt(i)
    }
    // Calculate SHA-256 of the buffer
    const sha256Buffer = new Uint8Array(await crypto.subtle.digest('SHA-256', buffer))
    // Convert the buffer back into base64
    let binary = ''
    for (let i = 0; i < sha256Buffer.byteLength; i++) {
        binary += String.fromCharCode(sha256Buffer[i])
    }
    return btoa(binary)
}

Chrome's Manifest V3 (MV3) changes have had a wide-ranging impact on the extension ecosystem. Primarily they are a set of API changes, that take away some of the most powerful extension APIs, replacing them with weaker, more restrictive ones.

Chrome have set a deadline for all extensions in the Chrome Web Store to migrate to the new MV3 APIs, which has meant that for the last 6 months or so, my team at DuckDuckGo have been busy migrating all the features of our Privacy Essentials extension over.

The latest feature I've been working on is our “Smarter Encryption”, which: 1. Ships a list of hostnames where we've verified that a HTTPs version of the site is available, cut to cover 90% of the most clicked domains duckduckgo.com. 2. Has an API for checking a domain against an extended list of HTTPs compatible websites.

The purpose is to ensure, that, where available, you're always on the secure version of a website, and if possible, your browser upgrades you before any insecure requests go out.

In MV2, we crammed the ~350,000 hostnames for the lookup data structure into a bloom filter. This compresses the 5.9 MB domain list down to just 1.6 MB, allowing us to keep this list in memory and synchronously upgrade all domains that match the bloom filter with the chrome.webRequest API.

MV3 removes the dynamic redirection capability of the chrome.webRequest API, in favour of declarative rules using the chrome.declarativeNetRequest API. These rules support an upgradeScheme action to support the use-case of upgrading insecure requests.

To match the behaviour of our MV2 bloom filter version, we need to write a declarativeNetRequest rule that matches the same set of ~350,000 domains as we include in our bloom filter. At a first pass, this seems simple enough: we can specify a list of requestDomains in a rule condition. The rule will match for any request that matches one of the domains in that list.

However, there's a catch. Adding example.com to the list of requestDomains will cause the rule to match for requests to example.com, as expected. It will also match requests to all subdomains of example.com (something which is not immediately obvious from the docs). Usually, this would be quite useful behaviour, but in the Smarter Encryption dataset we actually expect an exact domain match. This is because the fact that example.com supports HTTPS, does not imply that sub.example.com does. Therefore, all subdomains supporting HTTPS are explicitly included in the domain list.

This means that, having specified requestDomains, we need to prevent the rule matching for any subdomains of those domains. Luckily, my colleague kzar came up with a trick to do exactly that: 1. Group the list of domains by depth (number of .s). 2. For each group, create a rule with the list of domains in the group as requestDomains. 3. For each rule, add a regexFilter which matches only domains of the group's depth.

This allows us to match all ~350,000 SE domains in 4 declarativeNetRequest rules. These rules look like the following:

{
  "id": 1,
  "priority": 5000,
  "action": {
    "type": "upgradeScheme"
   },
  "condition": {
    "resourceTypes": [...],
    "requestDomains": [
      "en.wikipedia.org",
      "m.youtube.com",
      "m.imdb.com",
      ...
    ],
    "regexFilter": "^http://[^.]+\\.[^.]+\\.[^.]+(:|/|$)"
}

So, we have feature parity between MV2 and MV3! But at what cost? Before, we were running requests through a fast 1.6 MB bloom filter to check if an upgrade was possible. Now with MV3, we have to ship a 6.4 MB rule file, which will have to firstly match request domains against a list of ~350,000 domains, then run the URL through a regex (or do this in the reverse order). We have no control over how performant this is, as it is up to Chromium to implement efficient matching of declarativeNetRequest rules.

But that's actually not all – remember the second part of Smarter Encryption – the API for checking domains against the extended list? Well, that requires dynamic checking: when we see a new domain we need to make an asynchronous call to see whether it should be upgraded or not. This is not something declarativeNetRequest can do, so we have to listen for insecure requests via the webRequest API and trigger API calls for domains not on the bloom filter list. If the domain should be upgraded, where we used to use the webRequest redirects in MV2, we can now create a temporary 'session' declarativeNetRequest rule in MV3 to upgrade subsequent requests automatically.

The side effect of this, is that to do this in MV3, the entire MV2 code path has to remain, as we still need the bloom filter to efficiently check which requests the declarativeNetRequest rules will not upgrade. Therefore, MV3 is giving us a double performance penalty: Firstly, we have to include a very large rule file to move upgrade matching from webRequest to declarativeNetRequest, and secondly, we still have to match each request a second time in order to check requests beyond that list.

In summary: – Chrome's MV3 changes are taking away the part of the chrome.webRequest we need to implement Smarter Encryption. – We can achieve equivalent matching of the top ~350,000 domains using declarativeNetRequest. – To implement upgrades for domains beyond the 90th percentile, we still need to run our MV2 webRequest implementation in parallel. – The MV3 version is now 10x bigger for users to download and update, and spends at least double the resources to check for upgradable requests.

All this is not a surprise: at my previous job at Cliqz, we already published articles over 3 years ago debunking the privacy and performance claims of MV3.

My aging blog, built on Jekyll, has been becoming a pain to work with for a while. While hosting the static files is trivial, I had to dockerize the build process a while ago, as I had issues getting the correct ruby dependencies on modern OSes, and given the old dependencies used, it was not going to be possible to modernise it in any way.

This build friction was a demotivator when thinking about writing more, so I decided to take the plunge and try something new out.

As I like the aesthetic of write.as's WriteFreely software, which also has Fediverse support, I decided, with zero further research, to try it out. Following their getting started instructions, I was up and running in 10 minutes!

The set-up was extremely simple – unlike many self-hosted servers which need a whole host of dependencies installed and other services running, WriteFreely just uses a single go binary. Data is stored in a SQLite DB, so there's no need to install additional software.

I decided to import my old blog posts over. As the old Jekyll blog used Markdown posts, this was also quick, as WriteFreely also uses Markdown. To back-date the posts, it is possible to update the creation date when editing a post.

The final step was to add some custom routes to my Nginx config to ensure that some external links stay valid with some manual redirect rules:

location /about.html {
  return 301 /about-me;
}

As mentioned before, a side-benefit of WriteFreely is fediverse support. What that means is that fediverse clients can subscribe to new blog posts via the handle @[email protected].

Now we're up and running, the question is, whether this setup will encourage me to write me. Let's see how it goes...

Firefox's containers offer a way to create isolated browsing contexts, with browser storage (cookies, localStorage, cache etc) different in each one. Containers have many use-cases, from privacy – preventing cross-site tracking across contexts, to allowing you to login into multiple accounts of the same service simulataneously from a single browser.

Mozilla offer the Multi-account Containers addon for managing containers, and allowing you to automatically switch containers when visiting certain sites. However, I found a couple of use-cases missing for my needs: 1. Having multiple containers defined for a given domain which I can choose between when I load the site. This enables the multi-account-for-a-service use-case, for example if I want to have both my work and personal Google accounts open in different tabs. 2. Domains have to be added manually for containers via the UI. This ends up causing issues with sites that redirect you through multiple of their own domains (Microsoft is particularly guiltly of this) when logging in. Additionally, there's no way to add a list of all domains for a particular service if I always want to use the container for that company. 3. For anything that's not in a container I don't want to keep the cookies and storage they set. I want this cleared reguarly to prevent tracking of return visits and so that I am a new visitor whenever I return to a site.

To get all these use-cases covered I implemented Contained. This is a simple webextension for Firefox that managed containers for you and switches between containers automatically.

The simplest way to describe what Contained does is by looking at how a container is configured. Let's look at an example:

{
    name: "Microsoft",
    color: "purple",
    icon: "briefcase",
    domains: ["example.com"],
    entities: ["Microsoft Corporation"],
    enterAction: "ask",
    leaveAction: "default"
}

Going through the options: * name is the container name. * color is the colour this container is given in the Firefox UI. * icon is the icon for this container in the Firefox UI. * domains is a list of domains which should be loaded in this container. * entities are entities from DuckDuckGo's entity list which should be loaded in this container. * enterAction, can be 'ask' or 'switch' defines if the container should be automatically switched when navigating to this domain, or the user should be prompted to decide if they want to switch or stay in the current container. When there are multiple candidate containers for a domain the extension will always ask which container should be used. * leaveAction, can be 'ask', 'default' or 'stay', defines what happens when a the container tab navigates to a domain not in the list of domains. 'ask' will prompt the user, 'default' will switch back to the default (ephemeral) container, and 'stay' will remain in this container.

For every site visited that doesn't match a persistent container, the extension creates a temporary container. Every 3 hours a new container is created for use in future tabs. Containers are only deleted when the extension restarts (e.g. on browser restart, or when the extension is updated).

Configuration currently can only be done via extension debugging: Open the devtools console for the extension by navigating to about:devtools-toolbox?id=contained%40sammacbeth.eu&type=extension in the browser. There, you can read and modify the config by executing code in the console:

// check value of the config object
>> config
<- Object { default: "firefox-container-294", useTempContainers: true, tempContainerReplaceInterval: 120, containers: (7) […] }
// add or edit containers
>> config.containers.push({ name: 'New container', ... })
>> config.containers[0].domains.push('example.com')
// save the changes
>> storeConfig(config)

Config is kept in the browser's sync storage space, so if you are using Firefox sync you get the same container settings on all your devices.

The Contained extension can be downloaded for Firefox here. The source code is available here.

Over the last few months a small team of us at Cliqz have been building the new Ghostery browser as a Firefox fork. Drawing on our experience developing and maintaining the Cliqz browser, also a Firefox fork, over the last 5 years, we wanted to figure out a way to have as lightweight as possible fork, while also making the browser differentiated from vanilla Firefox.

Working on a fork of a high velocity project is challenging for several reasons:

  • The rapid release schedule upstream can overwhelm you with merge commits. If this is not managed well, most of your bandwidth can be taken up with keeping up with upstream changes.
  • Adding new features is hard, because you don’t have control over how upstream changes to components you depend upon might change.
  • The size and complexity of the project makes it difficult to debug issues, or understand why something may not be working.

This post describes how we approached our new Firefox fork, and the tooling we build to enable a simple workflow for keeping up with upstream with minimal developer cost. The core tenets of this approach are:

  • When possible, use the Firefox configuration and branding system for customizations. Firefox has many options for toggling features at build and runtime which we can leverage without touching source code.
  • Bundle extensions to provide custom browser features. We can, for example ship adblocking and antitracking privacy features by simple bundling the Ghostery browser extension. For features that cannot be implemented using current webextension APIs, experimental APIs can be used to build features using internal Firefox APIs that are usually off-limits to extensions.
  • Changes that cannot be done via configuration or extension, we can patch Firefox code. Ideally, patches should be small and targeted to specific features, so rebasing them on top of newer versions of Firefox is as easy as possible.

fern.js workflow

Fern is the tool we built for our workflow. It automates the process of fetching a specific version of Firefox source, and applying the changes needed to it to build our fork. Given a Firefox version, it will:

  1. fetch the source dump for that version,
  2. copy branding and extensions into the source tree,
  3. apply some automated patches, and
  4. apply manual patches.

The fern uses a config file to specify which version of Firefox we are using, and which addons we should fetch and bundle with the browser.

Customising via build flags

Firefox builds are configured by a so-called mozconfig file. This is essentially a script that sets up environment variables and compiler options for the build process. Most of these options concern setting up the build toolchain, but there is also scope for customising some browser features which can be included or excluded via preprocessor statements.

For the Ghostery browser we specify a few mozconfig options to, most importantly, change the name of browser and it’s executable:

  • ac_add_options --with-app-name=Ghostery will change the binary name generated by the build to Ghostery, instead of firefox.
  • export MOZ_APP_PROFILE="Ghostery Browser” changes the application name seen by the OS.
  • ac_add_options --disable-crashreporter Disables the crash reporter application
  • ac_add_options MOZ_TELEMETRY_REPORTING= Disables all browser telemetry

Branding

Firefox includes a powerful branding system, which allows all icons to be changed via a single mozconfig option. This is how Mozilla ship their various varients, such as Developer Edition and Nightly, which have different colour schemes and logos.

We can switch the browser branding with ac_add_options --with-branding=browser/branding/ghostery in our mozconfig. The build will then look into the given directory for various brand assets, and we just have to mirror the correct path structure.

Handily, this also includes a .js file where we can override pref defaults. Prefs are a Firefox key-value store which can be used for runtime configuration of the browser, and allow us to further customise the browser.

For the Ghostery browser, we use this file to disable some built in Firefox features, such as pocket and Firefox VPN, and tweak various privacy settings for maximum protection. This is also where we configure endpoints for certain features such as safe browsing and remote settings, so that the browser does not connect to Mozilla endpoints for these.

Bundling extensions

As we are using extensions for core browser features, we need to be able to bundle them such that they are installed on first start, and cannot be uninstalled. Additionally, to use experimental extension APIs they have to be loaded in a privileged state. Luckily Firefox already has a mechanism for this.

Firstly, we put the unpacked extension into the browser/extensions/ folder of the Firefox source. Secondly, we need to create a moz.build file in the extension’s root. This file must contain some python boilerplate which declares all of the files in the extension. Finally, we patch browser/extensions/moz.build to add the name of the folder we just created to the DIRS list.

This process is mostly automated by fern. We simply specify extensions with a URL to download them inside the .workspace file, and these will be downloaded, extracted, copied to the correct location, and with the moz.build boilerplate generated. The last manual step is to add the extensions to the list of bundled extensions, which we can do with a small patch.

Building

Once we have our browser source with our desired config changes, bundled extensions and some minor code changes, we need to build it. Building Firefox from source locally is relatively simple. The ./mach bootstrap command handles fetching of the toolchains you need to build the browser for your current platform. This is great for a local development setup, but for CI we have extra requirements:

  1. Cross-builds: Our build servers run linux, so we'd like to be able to build Mac and Windows versions on those machines without emulation.
  2. Reproducable builds: We should be able to easily reproduce a build that the CI built, i.e. build the same source with the same toolchain.

Mozilla already do cross-builds so we can glean from their CI setup, taskcluster, how to emulate their build setup. Firefox builds are dockerized on taskcluster, so we do the same, using the same Debian 10 base image and installing the same base dependencies. This base dockerfile is used as a base for platform specific dockerfiles.

Mozilla's taskcluster CI system defines not only how to build Firefox from source, but also how to build the entire toolchain required for the final build. Builds are defined in yaml inside the Firefox source tree. For example we can look at linux.yml for the linux64/opt build which describes an optimised linux 64-bit build. To make our docker images for cross-platform browser builds we use these configs to find the list of toolchains we need for the build. We can therefore go from a Firefox build config for a specific platform, to Dockerfile with the following steps:

  1. Extract the list of toolchain dependencies for the build from the taskcluster definitions.
  2. Find the artifact name for each toolchain (also in taskcluster definitions).
  3. Fetch the toolchain artifact from Mozilla's taskcluster services.
  4. Snapshot the artifact with IPFS so we have a perma-link to this exact version of the artifact.
  5. Add the commands to fetch and extract the artifact in the dockerfile.

This gives us a dockerfile that will always use the same combination of toolchains for the build. In our dockerfiles we also mimic taskcluster path structure, allow us to directly use mozconfigs from Firefox source to configure the build to use these toolchains. The platform dockerfiles, and mozconfigs are committed to the repo, so that the entire build setup is snapshotted in a commit, and can be reproduced (provided the artifacts remain available on IPFS).

Summary

This post has given a quick overview of how we set up the user-agent-desktop project for the new Ghostery browser as a lightweight Firefox fork. The main benefit of this approach can be seen when merging new versions of Firefox from upstream. With the Cliqz hard fork we often ended up with merge diffs with in the order of 1 million changes, and multiple conflicts to resolve. In contrast, under the user-agent-desktop workflow, we just point to the updated mozilla source, then some minor changes to manual patches so that they still apply properly, creating less than 100 lines of diff. What used to be a multi-week task of merging a new Firefox major version, is now less than half a day for a single developer.

Almost 5 years after I joined Cliqz, the company will be shutting down and cease to operate as it has done up to this point. This post is a look back at some of the exciting things we built during that time from my perspective, working on privacy and our web browsers.

Anti-tracking

Our anti-tracking, released in 2015, was—-and still is—-one of the most sophisticated anti-tracking systems available. The Cliqz browser had this anti-tracking enabled by default from its first version, while at that time no other browser had any protection by default (Safari's ITP would come two years later). Now all major browsers (except Chrome) ship with tracking protections that are enabled by default, and Chrome are looking to deprecate third-party cookies entirely within two years.

We also pushed hard for transparency on online tracking and where it occurs, naming the largest trackers and sites with the most trackers via our transparency project whotracks.me. We analysed billions of page loads to see which trackers were loaded and what they were doing, and published this data. We also collaborated with researchers to pull insights out of this data to inform policy around online tracking, as well as helping journalists publish stories about some of the most egregious cases.

The anti-tracking story is a big part of my story at Cliqz – maintaining and improving our anti-tracking was my main role for the last 5 years. I was also part of the small team that built out whotracks.me. Luckily all this will live on: The Cliqz anti-tracking tech has been built into Ghostery since version 8, and it will continue to be a core part of Ghostery's protections into the future. Likewise, while anti-tracking continues to operate, the data required for whotracks.me will continue to be available.

You can read more about the details of anti-tracking on the Cliqz tech blog.

Experimenting with the distributed web

One constant theme at Cliqz was how the browser can empower users, and how we could help users avoid service lock-in and the privacy consequences that often entails. One experiment in that direction was self publishing via the dweb, specifically the dat protocol. We built support for dat as a Firefox browser extension and shipped it as an experimental feature. Unfortunately this experiment is unlikely to be able to continue after the browser shut down, but the extension is open source and can also be installed in Firefox.

Crashing some Javascript engines

We put a lot of effort into running our large Javascript codebase on our mobile apps, in order to bring our features such as search and anti-tracking to mobile. This idea (implementing mobile apps in Javascript), has matured significantly in the last few years, but when we first approached this we were very much at the limits of what could be done with the platform and the tooling. A couple of times we hit those limits:

Back in 2016, we were running JS in raw JavascriptCore on iOS. Suddenly, a new build of our code starting instantly crashing the app. With essentially no debugging tools available that could pinpoint the error, we had to start dissecting the whole bundle. In the end we got to a 55 character snippet that would crash the Javascript engine, and bring the app with it. This also affected Javascript loaded in Webviews, meaning we could craft a website that crashed every iOS web browser on load.

Just over a year later, we'd switched to React-Native for our Javascript needs. This provided some stability improvements, but still we woke up one day to reports of our Android app crashing on launch. After a few hours of digging, we traced the cause to a version of a file in the CDN cache missing a Content-Encoding header. When the app fetched this gzipped file, but thought it was not compressed, react-native would crash when trying to encode the data to send to Javascript. We reduced this file to 3 bytes that would crash any react-native app:

Wrote some high performance Javascript libraries

Performance was always very important in our browser, particularly in anti-tracking and the adblocker, which had to process URLs as fast as possible in order to prevent an impact on page loading speed. We did a lot of optimisations here, and open sourced the libraries that came out of it:

  • To parse out the individual components of URLs as fast as possible, we wrote a new url-parser implementation that is between 2 and 10 times faster than the standard URL parsers available in the browser and node.
  • Our anti-tracking needs to extract features such as eTLD+1 from URLs. Tldts is the fastest and most efficient Javascript library available for that purpose.
  • Our open-source adblocker engine is the fastest and most efficient javascript implementation available.
  • Both anti-tracking and the adblocker's block lists were shipped as raw array buffers, meaning that clients could load them with no parsing step required. This was a significant win on mobile, where loading and parsing block lists on startup was a significant performance cost.
  • To better understand performance bottlenecks in our browser extension code, we wrote an emulator which could mimic the webextension environment in node, and simulate different kinds of workloads. We could then use node profiling tools to detect issues.

After the arrival of the GDPR, users started to get bombarded with consent popups on sites they visit. As well as being horrendous for the user experience of browsing the web, these consent popups manufactured false consent for online tracking. Publishers claimed 90+% opt-in rates on their sites as evidence that the tracking status quo could continue with user consent. In reality users either did not know there was a choice to opt-out, or the opt-out process was so complicated that privacy-fatigue set in quickly.

At Cliqz, we wanted to supplement the technical protection from tracking, provided by anti-tracking, with a legal protection by enabling users to choose to opt-out on sites with the equal effort to the 1-click opt-in process. This would also send the important signal to publishers that tracking is not wanted. We developed first the re:consent browser extension, then later the Cookie popup blocker.

Re:consent was based on the IAB's Transparency and consent framework, which was not designed for external modification of consent settings, and therefore was somewhat limited, and unable to reduce the number of popup seen by users. We learnt from that that the only way to inter-operate with banners was by pretending to be a user and clicking on the elements. The open-source autoconsent library implements this clicking, with rules for most major consent popup frameworks.

And much more

There are many more things that should be mentioned here, but this post has to stop somewhere. These highlights are some that are freshest in my memory, or had the most impact. Luckily most of this code for these projects is open-source, which means that no-matter the fate of Cliqz-itself, these ideas can still be revived and built upon.

The Dat-Webext extension provides native dat support in Firefox-based browsers, but due to it's use of experimental APIs, installation can be a bit tricky. This post will outline how to install it in Firefox Developer Edition or Nightly.

As the extension uses experimental APIs, it cannot be installed in stable Firefox release channels, as it is not signed by Mozilla. The developer edition and nightly channels allow this restriction to be lifted. There settings about be changed in the about:config page in the browser. Here are the full installation steps:

  1. Go to the about:config page and set xpinstall.signatures.required to false and extensions.experiments.enabled to true
  2. Download the latest version of the extension.
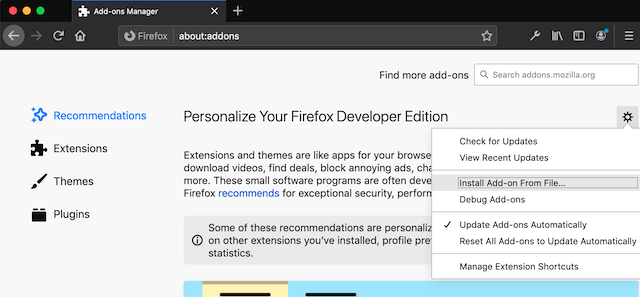
  3. Go to about:addons and choose 'Install addon from file' from the cog menu in the top right, then browse to zip file you just downloaded. The browser will ask for permissions to install.

The addon should successfully install, and you should now be able to navigate to dat sites as well as sites on the new hyper:// protocol.

The KDE Plasma Integration browser extensions enables better integration between Firefox and the KDE desktop environment, for example allowing media controls to control music or video playing in the browser, and for the Plasma search widget to be able to return open browser tabs in results.

As the Cliqz Browser on Linux is also based on Firefox the Plasma Integration extension should theoretically 'just work' too. However, as the extension uses Native messaging to communicate between browser and desktop environment, a manifest file needs to be installed so that the browser knows when process to launch. To get this working in Cliqz, we can simply copy over the Firefox manifest to the appropriate location:

mkdir -p ~/.cliqz/native-messaging-hosts/
cp /usr/lib/mozilla/native-messaging-hosts/org.kde.plasma.browser_integration.json ~/.cliqz/native-messaging-hosts/

This installs the manifest for the current user, so after installing the Plasma Integration extension in Cliqz everything should be working properly!

Over the last couple of years I have built and released two browser extensions for loading web pages over the dat protocol: dat-fox, which can be installed in Firefox, but requires a separate node executable to be installed, and dat-webext that uses internal Firefox APIs to run the full Dat stack inside the browser runtime, but requires extra privileges for installation, meaning it is currently only available in the Cliqz browser.

From building these extensions I ended up implementing several things twice, such as a protocol handler for Dat, and code for efficiently handling multiple dat archives open concurrently. I decided to try to unify this work into a single library that both extensions could share, and that could also streamline the building of other Dat tooling. This is sams-dat-api, a set of Typescript libraries for common Dat tasks, and which already handles all Dat networking in both dat-fox and dat-webext.

The project is set up as a monorepo, with multiple different modules in one git repository. Using the tool lerna this makes it easy to handle the inter-dependencies between modules, but with the advantage of publishing each component as an independent module, minimising the dependency footprint for module consumers.

This post will give a quick overview of the modules that exist so far, and how they can be used in dat applications.

Hyperdrive API

The Hyperdrive API is a high level API for working with multiple Hyperdrives and is designed to be agnostic of Hyperdrive version and swarm implementation. This is enables implementations on top of this API to be usable on multiple different stacks. This was done with Dat 2.0 in mind, as the Hyperdrive and swarming implementations are changing, but ideally we don't want to have to reimplement everything for this new stack.

The Hyperdrive API has implementations for the following:

  • @sammacbeth/dat-api-v1: The classic dat stack.
  • @sammacbeth/dat-api-v1wrtc: Classic dat with discovery-swarm-webrtc in parallel to improve connectivity. We use this in dat-webext.
  • @sammacbeth/dat2-api: The new dat stack, Hyperdrive 10 plus hyperswarm.
  • @sammacbeth/dat2-daemon-client: A dat2 implementation that talks to a hyperdrive-daemon service instead of running dat itself.

With all of these implementations you can write the same code to load and use dats:

// load a dat by it's address
const dat = await api.getDat(address);
await dat.ready
// join dat swarm
dat.joinSwarm();
// work with the underlying hyperdrive instance
dat.drive.readdir('/', cb);
// create a new dat
const myDat = await api.createDat();

Building on Hyperdrive

Using the Hyperdrive API and Typescript definitions as a base, we can quickly build utilities on top:

DatArchive

The DatArchive API is a popular abstraction for working with the Hyperdrive API. The @sammacbeth/dat-archive module provides a implementation of this API that can be used with a provided Hyperdrive instance (like those provided by the HyperdriveAPI).

import createDatArchive, { create, fork } from '@sammacbeth/dat-archive';
// create a DatArchive for a Hyperdrive
const archive = createDatArchive(dat.drive);
archive.getInfo().then(...)
// create
const myArchive = await create(api, options, manifest);

Dat Protocol Handler

@sammacbeth/dat-protocol-handler implements a protocol handler that matches Beaker Browser's implementation, including extra directives specified in dat.json:

import createHandler from '@sammacbeth/dat-protocol-handler';
const protocolHandler = createHandler(api, dnsResolver, options);
// get a stream from a dat URL.
const response = await protocolHandler('dat://dat.foundation/');

Dat publisher

@sammacbeth/dat-publisher is a CLI tool and library that enables the creation, seeding and update of dat archives, with a prime use-case of site publishing in mind. Building on my approach outlined in a previous post, the tool brings this into a single command and using the aforementioned abstractions. This means we should be able to easily bring support for the next gen of Dat down the line.

This tool is currently being used to publish this site, as well as 0x65.dev and the Dat Foundation website.

Summary

I've put together this library and these tools largely to help consolidate code across my own dat-related projects, but hopefully they can also be useful for others. I am working on updating the documentation to make the project easier to approach (hence this post), but I also hope that the choice of Typescript make the modules an easier entrypoint to the dat ecosystem.

The new Firefox Preview for Android uses Mozilla's Geckoview to replace Android's standard Webview component. This enables a fully Gecko-based browser, but without the bloat of much of the Firefox desktop codebase, that the original Firefox suffers from. We can expect a much faster and cleaner browsing experience thanks to these changes, and the Geckoview and Mozilla Android Components libraries offer exiting tech for developers of Android apps that require some kind of Webview or browser functionality.

However, one thing missing from the Firefox Preview MVP are browser extensions. The availability of extensions on the original Firefox for Android has long been it's USP compared to other Android browsers. While the Mozilla Android team have not been working on Webextension compatibility, a lot comes for free with Geckoview, and the android components browser Engine abstraction also already contains a method to installWebExtensions and this is implemented in the Geckoview implementations. What that means is that Webextensions can be run in Geckoview on Android, and this post will show how to do it.

Installing the extension in your Android project

  1. Unpack the extension (if it's a .xpi you can extract it as a .zip) in to a folder. This folder should have a manifest.json file in the root, and contain all the sources for the extension.
  2. Move this folder into the assets folder of your Geckoview app:

    mkdir -p ./app/src/main/assets/addons
    mv /path/to/extension ./app/src/main/assets/addons/
    
  3. Now, in your app, after you load your Engine instance, you can simply install the extension as follows:

    // Engine creation
    val engine = EngineProvider.createEngine(context, settings)
    // Install addon
    engine.installWebExtension(
    addonId, // addonId must be constant to ensure storage remains across restarts
    "resource://android/assets/addons/extension"
    )
    

You can further check if the installation was successful by passing callbacks to the install operation.

Debugging the extension

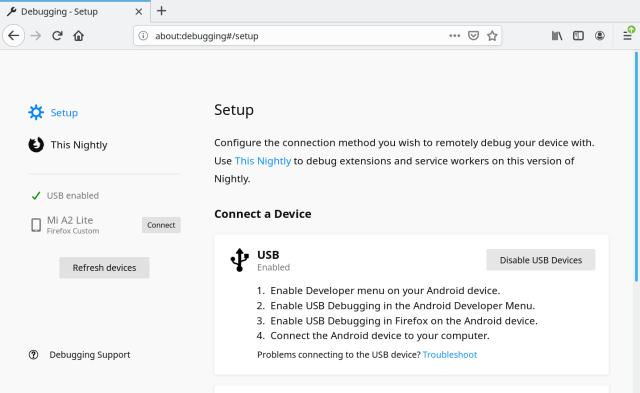
Extensions can be debugged on a connected computer using Firefox Nightly, in the same was as was previously possible in Firefox for Android. You can enable debugging of the Gecko engine simply by setting engine.settings.remoteDebuggingEnabled = true. In the reference-browser this option is expose in the app settings. Once enabled, and the device is connected to a computer, the device should be visible in about:debugging in Nightly:

Nightly debugging page

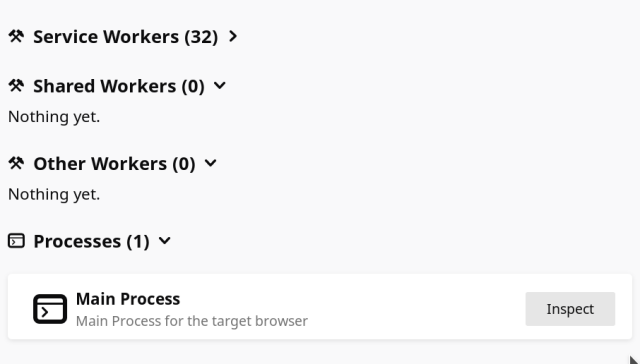
After connecting and selecting your device, you should be able to see various debuggable contexted, such as your currently open tabs and service workers. To debug the extension go to the very bottom and inspect the Main Process:

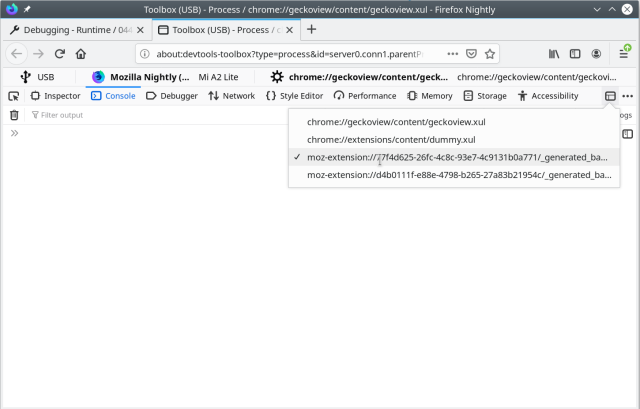
The last step is to chose your extension document in the dropdown on in the top right. This allows you to debug in the context of your extension background script.

Now you can debug as you would on desktop!

API Compatability

I mentioned at the start that a lot of extension compatibility 'comes for free'. Thanks to patches from my colleague chrmod to specifically fix tabs and webRequest APIs, most common use-cases are covered now in the Nightly Geckoview build. One compatibility caveat is that all UI APIs do not work, as the hooks to handle concepts like page and browser actions should be handled on a per-app basis.

Here is a quick (and incomplete) list of the current Javascript API compatibility:

  • alarms – ✔
  • bookmarks – Not supported (browser.bookmarks is undefined)
  • browserAction – Not supported
  • browserSettings – Partial. Some settings are not applicable and reject when accessed.
  • browsingData – Partial. Some functions missing (removeHistory), and others do not return removeCache.
  • contentScripts – ✔
  • contextualIdentities – API is present, but throws "Contextual identities are currently disabled". May work if the preference is enabled in about:config
  • cookies – ✔
  • dns – ✔
  • extension – ✔
  • find – Not supported
  • history – Not supported
  • idle – ✔
  • management – Partial.
  • menus – Not supported
  • notifications – API is present and responds as if successful, but no notifications are shown.
  • pageAction – Not supported
  • privacy – ✔
  • proxy – ✔
  • runtime – Partial. openOptionsPage throws for example.
  • search – Not supported
  • sessions – Not supported
  • sidebarAction – Not supported
  • storage – ✔
  • tabs – ✔ (tabs.create requires a handler on the app side)
  • topSites – Not supported
  • webNavigation – ✔
  • webRequest – ✔
  • windows – Not supported

This means that most of the core is there, minus UI APIs. Also, as history and session storage is separate from the Webview, APIs based on access to this information do not currently work.